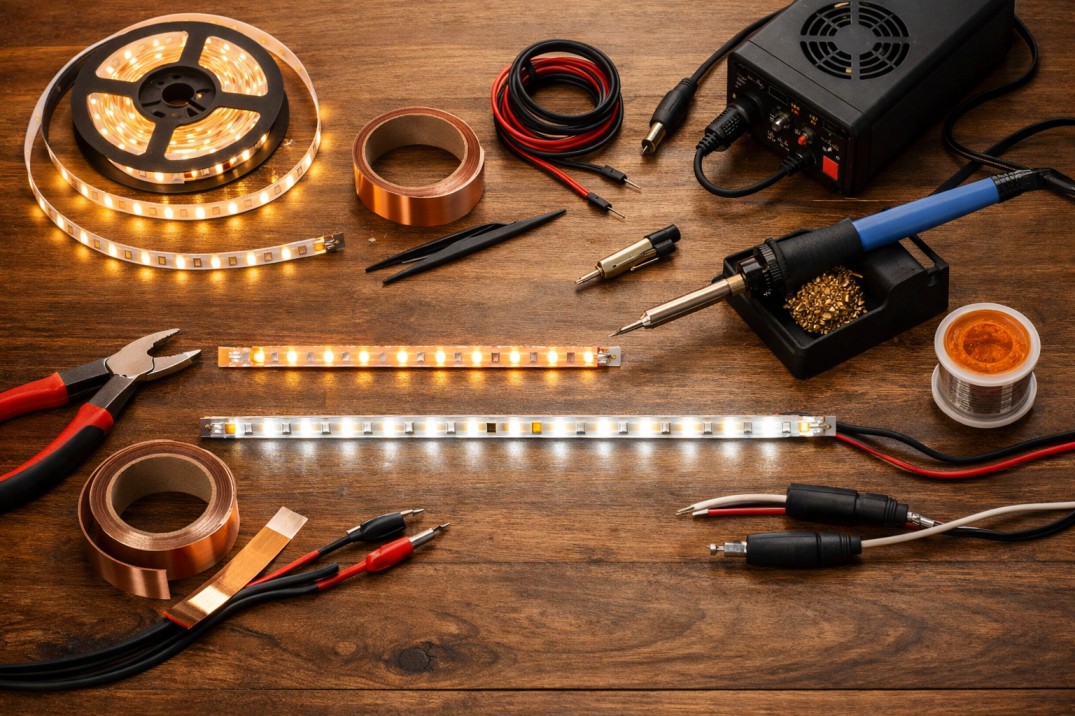
Are you looking to create a seamless, customized LED lighting setup without the hassle of using connectors? Learning how to connect LED lights without a connector can save you time and money, while also giving you the freedom to design your space exactly as you envision it. Whether you're installing lights for a home project or a creative installation, connecting LED light strips without connectors allows for a cleaner, more flexible approach. In this guide, we'll show you simple, effective ways to achieve this, whether you're working with LED Bulbs, flexible strips, or custom lighting configurations. From soldering to using conductive adhesives, these techniques not only make your setup more cost-effective but also help you avoid bulky connectors that can disrupt the aesthetic. Let’s dive into the step-by-step process of connecting LED lights in a way that perfectly suits your project.
Key Highlights
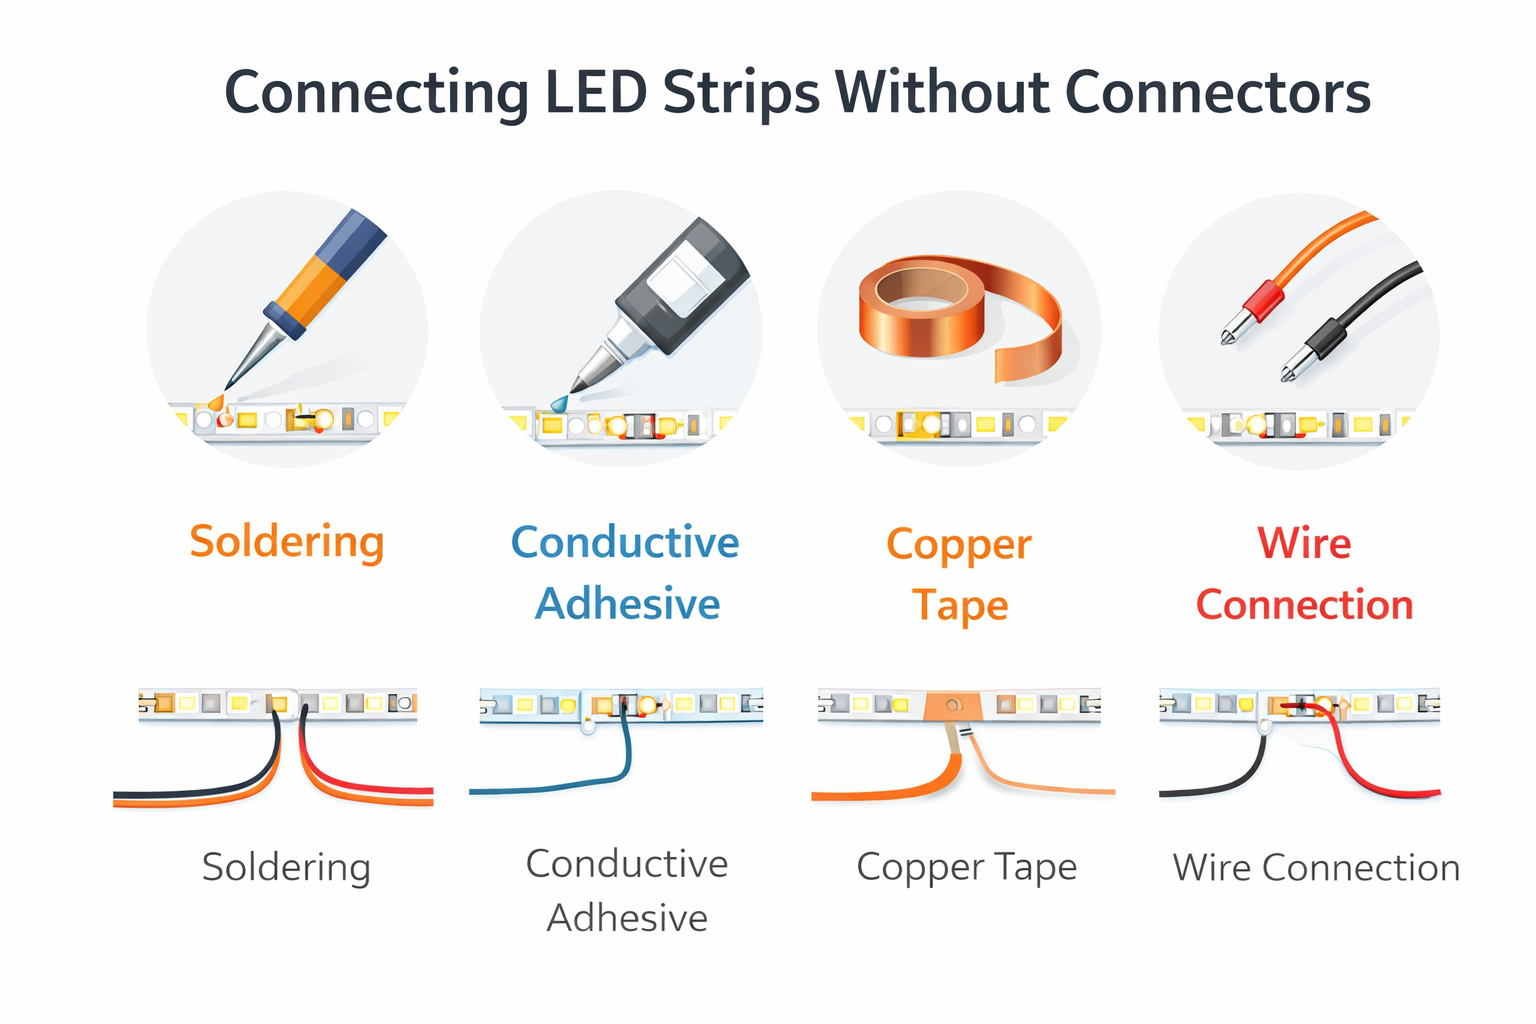
- We connect LED strips without connectors using four reliable methods- soldering, conductive adhesive, copper tape, and direct wire joins.
- We start with clean, exposed copper pads and ensure the correct polarity to maintain a stable LED circuit connection from the first test.
- We pick soldering for the strongest, neatest join when permanence matters and space is tight.
- We use conductive adhesive when we want a no-heat, tool-light approach that’s fast and tidy.
- We choose copper tape for its thin, flexible properties, making it ideal for creating bridges across pads and awkward corners.
- We use direct wire connections for easy extensions and repairs, and then thoroughly insulate them.
- We size the power supply based on the total strip length and wattage, allowing for 10–20 percent headroom.
- We prevent shorts with heat-shrink or high-quality electrical tape on every exposed joint.
- We troubleshoot by checking polarity, continuity with a multimeter, and reflowing or re-seating weak joints.
- We keep safety first with ventilation, careful iron handling, and proper strain relief.
Step-by-Step Process- How to Connect LED Lights Together (Without a Connector)
When you decide to connect LED lights without a connector, you’re taking the DIY route to create cleaner, more customized setups for your lighting needs. Let's find out how to do it efficiently and safely, starting with the most reliable method- soldering.
Method 1- Soldering LED Lights Together
Soldering provides a strong and durable connection for LED circuits, making it one of the most effective methods for connecting LED strips. If you're comfortable with a soldering iron and looking for a clean, permanent solution, this method is ideal.
Step 1- Gather Materials
Get all the necessary materials for a smooth process. You will need-
- A fine tip soldering iron(for precise work).
- Soldering wire (typically lead-free for safety).
- Wire (for connecting the LED strips).
- Insulation using heat shrink tubing or electrical tape.
- LED light strips that have exposed copper pads for soldering.
- Scissors or a utility knife are needed to cut strips as required.
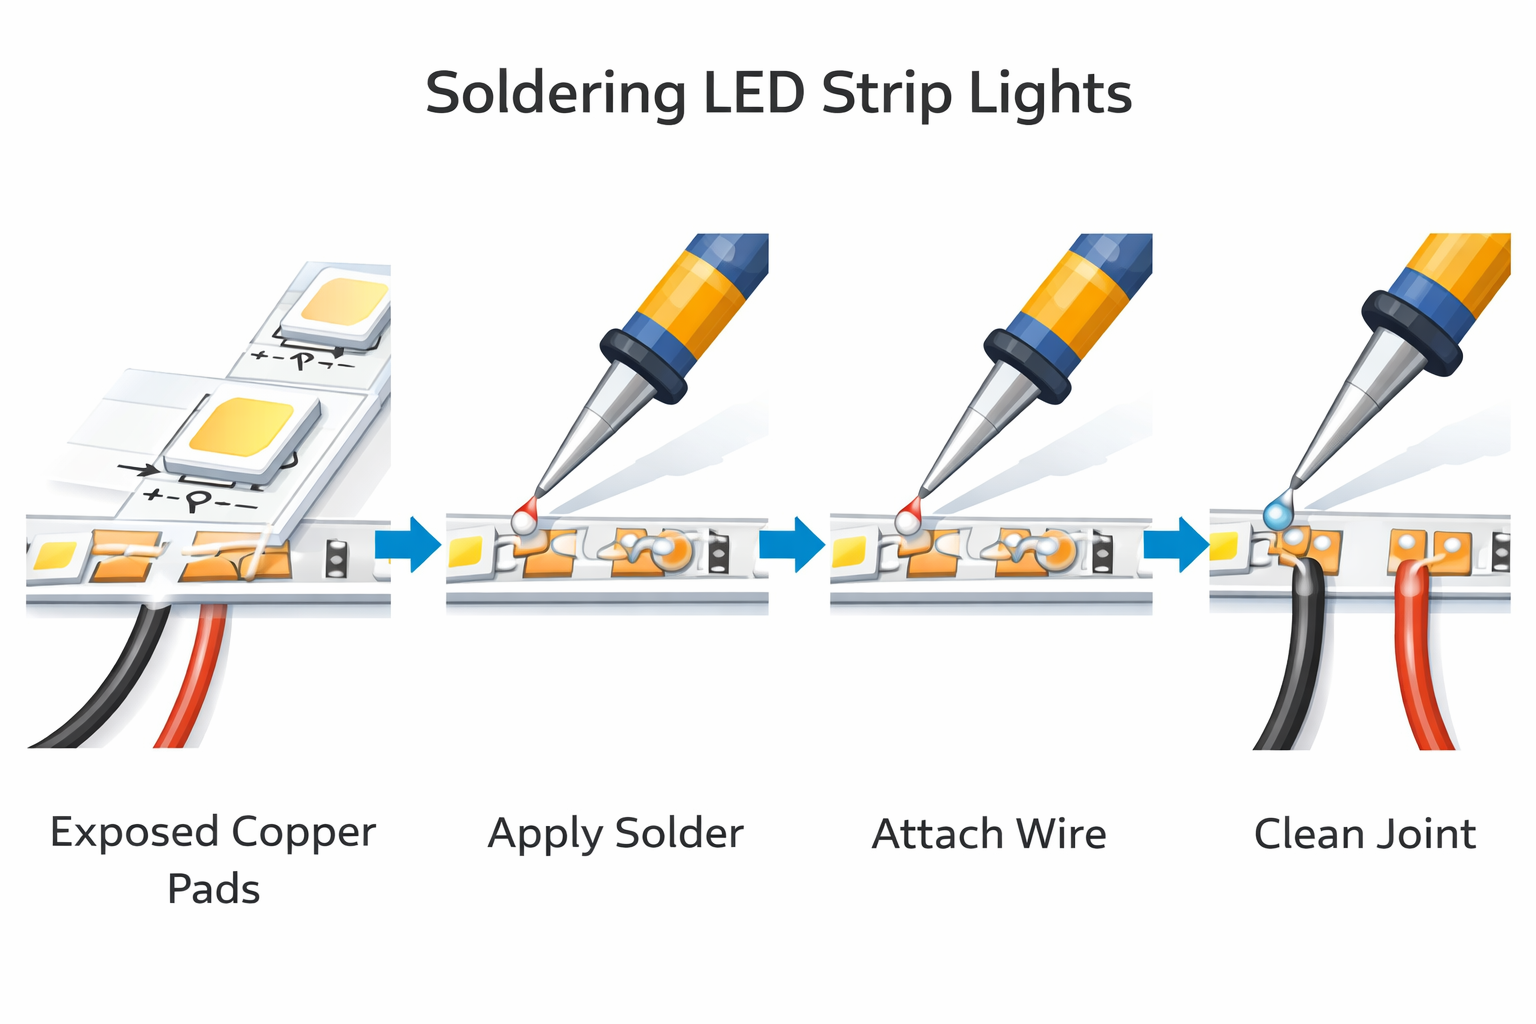
Step 2- Prepare the LED Strips
Next, you need to prep the LED strips. First, measure and cut the strips to the desired length. Most LED strips will have small copper pads where the connections will be made. Use your knife to remove any excess material around the copper pads, exposing enough of the surface for the soldering process to proceed.
Tip: Always check the polarity of your strips. Incorrect soldering can cause them not to work, or worse, cause a short.
Step 3- Solder the Wires to the Copper Pads
Now it's time to make the connection. Use the soldering iron onto the copper pads of the LED strips. This will allow the wire to be securely attached to the copper pads, ensuring a reliable connection for the LED circuit. Once the solder is melted, place the wire onto the pad and allow it to cool. Ensure you don't apply too much heat to avoid damaging the LED strip or its surrounding components.
Tip- For a clean finish, use fine-tipped tweezers to hold the wires in place while soldering.
Step 4- Safety Tips for Handling the Soldering Iron
While soldering is a straightforward process, safety is critical. Always-
- Wear protective gloves to avoid burns.
- Work in a well-ventilated area to avoid inhaling fumes.
- Ensure your soldering iron is securely placed on a heat-resistant surface when not in use.
Once your wires are attached to the copper pads, use heat shrink tubing to insulate the connections or secure them with electrical tape to prevent accidental shorts. Now, you've successfully made an LED circuit connection without needing connectors!
Method 2- Using Conductive Adhesive
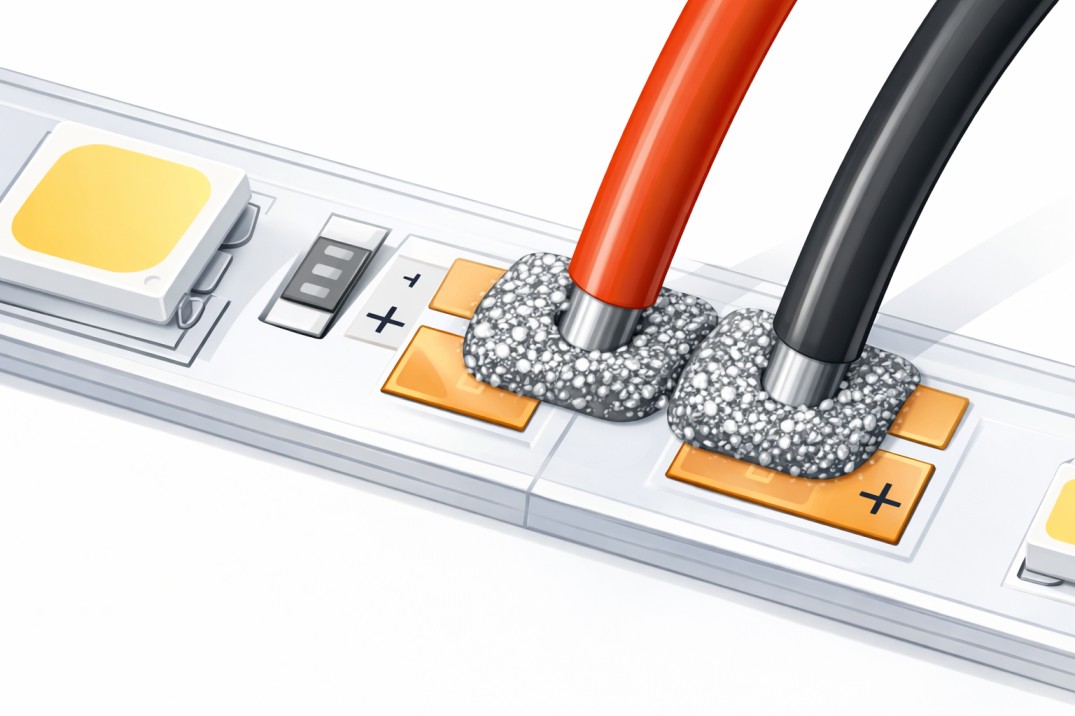
Conductive adhesive is a type of glue that allows electrical current to pass through it. It’s designed explicitly for creating connections between electronic components, like LED strip lights, without the need for soldering or connectors. The adhesive contains metallic particles that conduct electricity, which makes it ideal for creating LED circuit connections between LED strips.
This method is beneficial for those who prefer not to use tools like soldering irons or copper tape. It’s also helpful for creating more flexible and mess-free connections. Conductive adhesive can bond to various surfaces, making it ideal for custom installations where you might want to affix LED Bulbs to unconventional surfaces.
How to Apply Conductive Adhesive to Connect LED Strips
Applying conductive adhesive is straightforward and doesn’t require specialized skills or tools. Here’s how to do it-
- Prepare the LED Strips- As with other methods, you’ll need to cut the strips to the desired length and clean the copper pads where the connection will be made. Exposing the copper is crucial for a good bond.
- Apply the Adhesive - Apply the conductive adhesive to the exposed copper pads. Ensure it covers the entire area that will make contact with the connecting wire or other pad.
- Attach the Wires- Press the wire (or another strip of LED light) into the adhesive, ensuring a firm connection. You may need to hold it in place for a few seconds until the adhesive sets.
- Let it cure- Let the adhesive to cure fully according to the manufacturer’s instructions before applying power to the strips.
Advantages of This Method
Using conductive adhesive is simple. No specialized tools or experience are required, making it an excellent option for beginners. It also creates a clean connection without the need for visible connectors. Additionally, it’s versatile and can be used for different types of LED circuit connections. The adhesive is also flexible, making it a good choice for installations that require bending or custom shapes.
Using conductive adhesive also means you don’t have to worry about damaging the components with excessive heat, as you might with soldering irons. This makes it an excellent solution for resetting LED Strip lights without worrying about any safety risks.
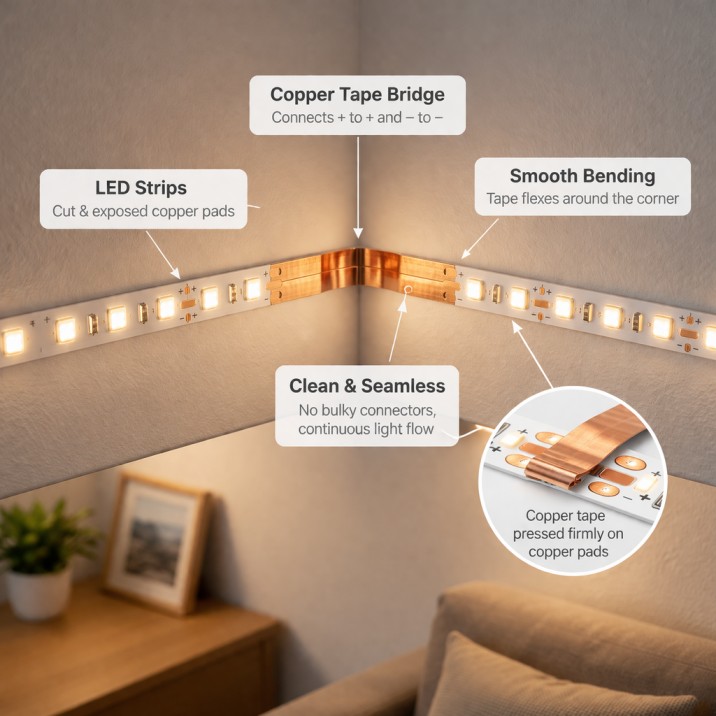
Method 3- Using Copper Tape for Connections
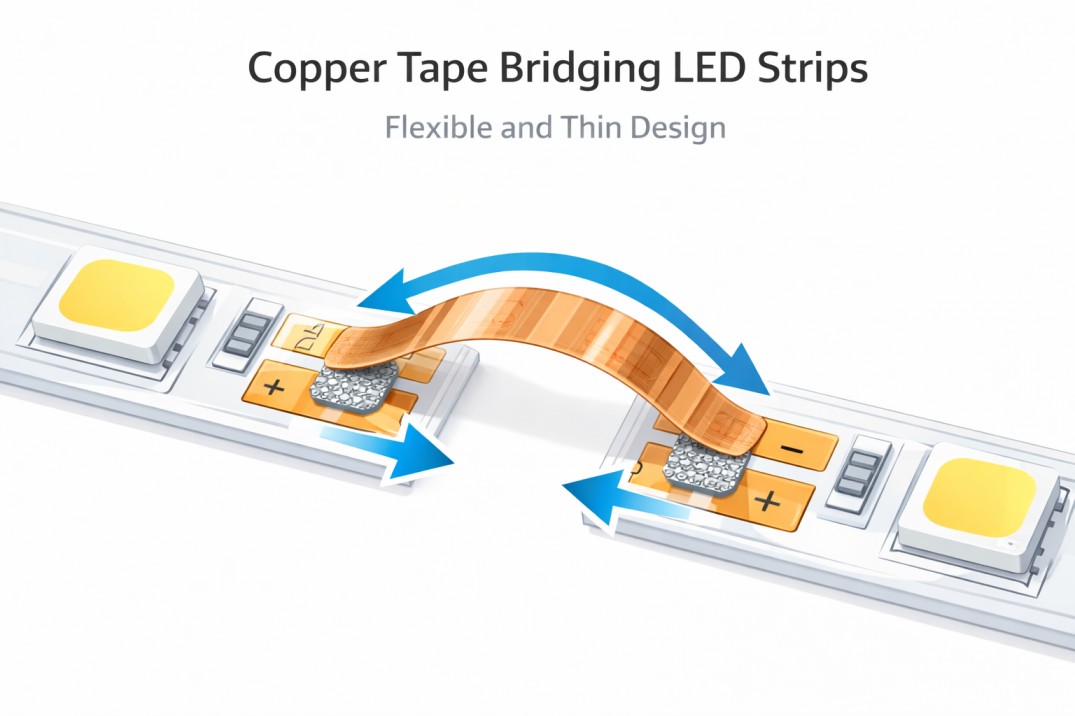
Copper tape is another excellent solution for connecting LED lights without the need for connectors. It’s a thin, flexible adhesive tape with a copper surface that conducts electricity, making it perfect for LED circuit connections. Copper tape is handy for tight or narrow spaces where soldering might be difficult or impractical. It's easy to use, requires no heat, and is ideal for DIY lighting projects where precision is key.
The conductive properties of copper tape allow for secure connections between LED strips, ensuring your lighting setup functions properly. Moreover, copper tape can be found in many craft stores, making it an accessible option for most DIY enthusiasts. Whether you’re installing LED Bulbs or custom LED strips, copper tape is a quick and reliable solution.
Step-by-Step Guide to Using Copper Tape for Connecting LED Strips
- Prepare the LED Strips- Start by cutting the LED strip to your desired length. Ensure the copper pads are exposed and ready for connection. Clean any debris around the copper pads to ensure proper adhesion.
- Apply Copper Tape - Cut a strip of copper tape long enough to cover the copper pads on the LED strip. Apply the tape directly onto the copper pads, ensuring it adheres well to the surface. The adhesive on the copper tape will hold it in place.
- Connect the Tape- For a strong LED circuit connection, press the ends of the copper tape firmly onto the corresponding pads of the adjacent LED strips or onto the wires. You can overlap the copper tape slightly to ensure a stronger bond.
- Secure the Tape - If necessary, use additional adhesive or electrical tape to secure the copper tape in place, especially when working with bends or tight spaces. The tape should stay in place without shifting or lifting.
Ensure Proper Alignment and Secure the Tape
It’s crucial to ensure the copper tape is applied smoothly and evenly. Misalignment can cause poor connections or even a short circuit. Use a ruler or measuring tape to align the copper tape properly along the pads. When securing the copper tape, avoid leaving any gaps between the tape and the LED pads, as this could interrupt the current flow and prevent the strips from lighting up correctly.
By ensuring the copper tape is firmly in place, you create a reliable connection between the LED strips. If you ever need to reset or troubleshoot LED Strip lights, copper tape connections are easy to adjust or replace without causing damage to the LED strips.
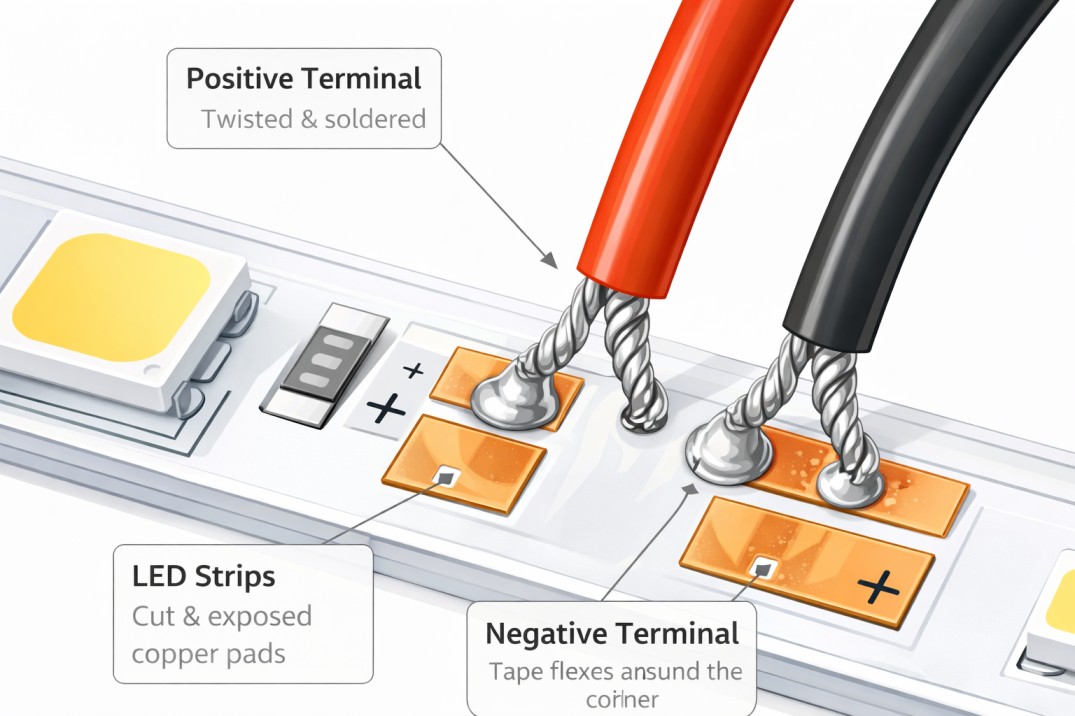
Method 4- Using Wires (Direct Wire Connection)
For those who prefer a more traditional approach to connecting LED lights, using wires directly for connection is an excellent option. Here’s how to connect LED strips using wire-
- Strip the Wires- First, select a wire as per current requirements of your LED strip. Use a wire stripper to get rid of the insulation from the ends of the wire, exposing enough copper for a solid connection.
- Prepare the LED Strips- As with other methods, carefully cut the LED strip tand expose the copper pads.
- Connect the Wires- Twist or solder the stripped wire ends onto the copper pads of the LED strip. Press the wire firmly against the pad. For a stronger connection, you can use solder or simply twist the wires tightly around the copper pads.
Proper Insulation Techniques to Avoid Shorts
Once the wires are securely connected to the LED strips, it’s essential to insulate the connections to avoid any short circuits. Use electrical tape, heat shrink tubing, or any other insulating material to cover the exposed wire ends and copper pads.
- Heat Shrink Tubing- Slip the tube over the exposed wire and apply heat to shrink it. This will create a tight, secure, and insulated connection.
- Electrical Tape- Wrap the tape around the open wire to insulate the connection. Make sure that no copper wire is exposed, as this could lead to shorts.
Proper insulation is crucial for both the safety and longevity of your LED strips. It also helps maintain a consistent current flow through the LED circuit connection, ensuring the lights operate smoothly without risk of damage or malfunction. If you ever need to reset LED Strip lights, these direct wire connections can be easily adjusted or replaced without hassle.
Troubleshooting Common Issues
When connecting LED lights without connectors, sometimes things don’t go as planned. Here’s what you can do if your connection doesn’t work-
What to Do if the Connection Doesn’t Work
If your LED strips aren’t lighting up, the first thing to check is whether the power supply is functioning correctly. Ensure that the LED circuit is correctly connected to the power source. If your lights are powered through a transformer, check that it’s providing the correct voltage for your strips. If you’ve used soldering or copper tape, inspect the solder joints or tape connections for any visible signs of damage or poor contact.
Another key thing to check is polarity. LED strips are polarity sensitive and must be correctly aligned. If the wires or connections are reversed, the lights won’t turn on.
How to Check for Broken Connections or Faulty Circuits
To check for broken connections, visually inspect the LED strips for any loose wires, solder joints, or gaps in the copper pads. Use a multimeter to test the continuity of the circuit-this will help you identify any points where the current isn’t flowing correctly. If you find any breaks in the circuit, re-solder the connection or apply more copper tape or conductive adhesive to restore the link.
Be sure to double-check your Reset LED Strip lights if you’re still experiencing issues, as resetting the circuit may resolve any minor glitches.
Key Takeaways
In summary, several methods exist for connecting LED lights without connectors, offering flexibility, convenience, and clean results. Whether you choose soldering, conductive adhesive, copper tape, or direct wire connections, each method offers its own unique benefits depending on your project’s needs.
Quick Summary of Methods
- Soldering provides a strong, permanent connection, but it requires specialized tools and skill. Ideal for those seeking a clean and durable solution.
- Conductive Adhesive- No tools are required, making it a mess-free and straightforward option. Best for those who want a flexible and easy-to-apply method.
- Copper Tape- An excellent alternative for tight spaces, copper tape is easy to apply and doesn’t require heat. It's perfect for smaller DIY projects.
- Direct Wire Connections- A more traditional and reliable method. Offers solid connections and flexibility when combined with proper insulation.
Each method offers ease and flexibility depending on your comfort level with tools. Conductive adhesive and copper tape are ideal for beginners, while soldering and wire connections are suitable for those seeking a more permanent and robust setup. Whether you're working with LED Bulbs or strips, these methods provide reliable solutions that can be customized for any lighting project. The best part? These techniques enable you to reset LED Strip lights without worrying about connectors, keeping your installation neat and efficient.
FAQs
1. How do you connect LED strip lights without a connector?
You can connect LED strips without connectors using methods like soldering, conductive adhesive, copper tape, or direct wire connections. Each technique involves securing the copper pads of the LED strips to wires or other pads to create a continuous circuit, ensuring a stable connection for the LED circuit.
2. Can I extend my LED strip lights without connectors?
Yes, you can extend LED strip lights using soldering or copper tape. This allows you to join multiple strips, creating a longer lighting setup without the need for additional connectors.
3. Are there any risks in connecting LED strips without connectors?
Yes, the primary risk is overheating, especially when soldering or using excessive power. It's essential to ensure that your connections are solid and well-insulated to prevent shorts. Always weare gloves and work in a well-ventilated area, when handling tools or adhesives.
4. What type of power supply should I use when connecting LED strips?
The power supply should match the voltage requirements of your LED strips. Overloading the circuit can cause damage, so use a reliable power supply with sufficient wattage to handle the total load of all connected strips. Always check the specifications before powering up.
5. What should I do if my LED strips are not lighting up after connecting them?
First, check the power supply to ensure it’s working correctly. Inspect the connections for any loose wires, poor soldering, or misalignment of copper tape. Use a multimeter to test the circuit and ensure the polarity is correct. If needed, reset the LED Strip lights and recheck the setup.
Wrapping Up
Connecting LED strips without connectors offers a practical and customizable approach to lighting setups. Whether you choose soldering, conductive adhesive, copper tape, or direct wire connections, each method provides a flexible solution for various projects. Create professional-quality, seamless connections that suit your LED light decoration ideas. Remember to prioritize safety and ensure your power supply meets the requirements. With these techniques, your LED installations will be reliable, efficient, and customized.
Bring your lighting ideas to life with Buy LED Online today and find out endless possibilities for your next project!