LED strip lights (LED light strips or flexible LED tape) have revolutionized modern lighting. They offer innumerable possibilities, whether you want to add a subtle glow under kitchen cabinets, create mood lighting in your living room, or highlight shelves in your store.
However, many DIY enthusiasts hesitate to modify their lights because they’re unsure how to cut and connect LED strip lights without damaging them. The good news is that it’s easier than you think if you follow the proper steps.
This guide will walk you through safely cutting LED strip lights, connecting them together, and connecting them to a power supply so you can create your dream lighting setup.
Understanding LED Strip Lights
Knowing what you’re working with is essential before cutting and connecting. LED strip lights have malleable circuit boards with LED chips that emit light when powered.
They come in various types-
- Single-color LED strips – Perfect for consistent accent lighting.
- RGB LED strips – This let you change colors via a controller.
- RGBIC LED strips – Advanced version with individually controlled segments.
- Smart LED strips – Can be controlled with apps like Google Home, Alexa, or Philips Hue.
Can You Cut LED Strip Lights?
Yes, you can cut LED strip lights as long as you cut them in the right place. Manufacturers design these strips with pre-marked cutting lines (usually every 3 to 5 LEDs), so you can safely shorten them without affecting functionality.
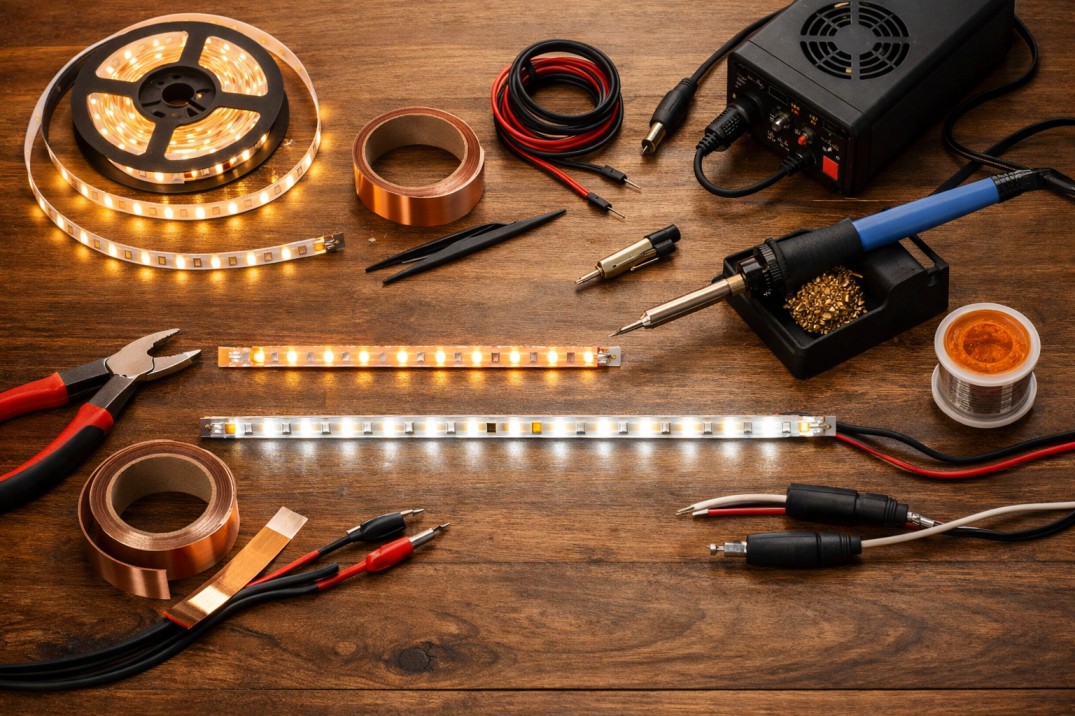
Tools and Materials You’ll Need
Before learning how to cut LED strip lights and connect them, gather the following-
- LED strip lights (like Govee, Philips Hue, or generic SMD 5050/3528 strips)
- Sharp scissors
- LED strip connectors (clip-on or solder type)
- Wire cutters and strippers
- Power supply adapter (compatible voltage, typically 12V or 24V)
- Soldering iron (optional for permanent connections)
- Heat-shrink tubing or electrical tape
- Measuring tape
Step 1- How to Cut LED Strip Lights
When you want to shorten a strip for your space, follow these steps-
- Measure your space
Take a measuring tape to measure the exact length you need for your project. - Locate the cutting line.
You’ll find copper pads marked with a scissor icon on most LED light strips. This is your safe cut point. - Cut precisely
Use sharp scissors to cut straight across the copper pads. Avoid cutting between LEDs without hitting the copper contact — doing so will break the circuit. - Seal the cut ends
If you don’t reconnect the cut piece immediately, seal the exposed copper pads with electrical tape to prevent short circuits.
Pro Tip- Cutting anywhere other than the designated line can render that section unusable.
Step 2- How to Connect LED Strip Lights
Once you’ve cut your strips, you may need to join them again. For example, to go around corners or extend a run.
Two primary methods for connecting LED strip lights-
1. Using LED Strip Connectors (No Soldering)
- Open the connector clip.
- Align the copper pads on the LED strip with the connector’s metal prongs.
- Close the clip until it locks securely.
- Test before installing permanently.
Best for- Beginners who want quick, tool-free connections.
2. Soldering LED Strips (Permanent & Reliable)
- Strip the silicone coating (if waterproof) to expose the copper pads.
- Apply solder to both the pads and the connector wires.
- Join the wires to the correct polarity (+ to +, – to –).
- Cover with heat-shrink tubing for insulation.
Best for- Permanent setups or high-current applications.
Step 3- How to Connect LED Strip Lights to a Power Supply
Even if you’ve connected your strips, they won’t work without power. Here’s how-
1. Check the voltage requirement
Most LED strip lights are 12V or 24V DC. Always match your power supply to your strip’s voltage.
2. Choose the correct power adapter.
Calculate the total wattage- Wattage per meter × total meters = required wattage. Add 20% for safety.
3. Connect to the power supply.
If your strip has a DC barrel connector, simply plug it in. For bare wires, match the positive (usually red) and negative (black) to the adapter’s terminals.
4. Optional- Use a controller or dimmer
Connect through a controller before the power supply for color and brightness control for RGB or smart strips.
Step 4- How to Cut LED Strip Lighting and Reconnect
If you need to cut your strips to fit around corners or obstacles, you can reconnect them using-
- Straight connectors – For inline connections.
- Corner connectors – For 90° bends.
- Extension cables – To bridge gaps.
Example- When installing under kitchen cabinets, you might cut a strip at a corner, connect it with a corner connector, and continue along the next cabinet.
Safety Tips When Working With LED Strip Lights
One must take specific safety and precautionary measures when working with LED strip lights.
- Always disconnect power before cutting or connecting.
- Double-check polarity before connecting.
- Avoid bending strips sharply; this can damage the circuit.
- Use waterproof-rated connectors for outdoor or damp locations.
- Don’t exceed the maximum length for your strip type to avoid voltage drop.
Creative Uses for LED Strip Lights
Want to make your home brighter in a creative way? Check out the tips shared below and make your home stand out.
- Home décor- Under-cabinet lighting, behind TVs, under beds, or inside shelves.
- Commercial- Display lighting in retail stores and restaurant ambience.
- Events- Party backdrops, stage edges, or mood lighting.
- Automotive- Interior footwell lighting or underglow (check local laws).
Troubleshooting Common Issues
Specific issues may occasionally crop up when working with LED Strips. Here are a few such problems and their solutions.
- One section not lighting up – Check for a faulty cut or bad connector.
- Dim lights – May be due to voltage drop; use shorter runs or higher voltage strips.
- Wrong colors on RGB strips – Likely a polarity mismatch in the connection.
- Flickering – This could be caused by a loose connector or insufficient power supply.
Final Thoughts
Learning to cut and connect LED strip lights opens up endless possibilities for personalizing your lighting setup. Whether you’re figuring out how to connect LED strip lights for a larger installation or just need to know how to connect LED strip lights to a power supply, the process is straightforward once you know the basics.
Following the steps above, you’ll have a safe, customized, and beautifully lit space — whether for your home, office, or business.
FAQs
Can I cut LED strip lights anywhere?
No. To keep the circuit intact, you must cut only at marked copper pad points.
How do I connect LED strip lights without soldering?
Use clip-on LED strip connectors that align with the copper pads.
How to connect LED strip lights to a power supply?
Match the voltage, connect the positive and negative terminals correctly, and use a compatible adapter.
Can I connect multiple LED strip lights?
Yes, but ensure the total length does not exceed the manufacturer’s limit to prevent voltage drop.
How do I cut waterproof LED strip lighting?
Carefully cut at the marked points, then reseal with waterproof silicone or use waterproof connectors.
Why are my LED strip lights not working after connecting?
Check the polarity, connection quality, and ensure your power supply meets voltage and wattage requirements.
Can I use any power adapter for my LED strips?
No. Always use an adapter that matches the strip’s voltage and can handle the required wattage.